How To Modify The Wind Tunnel (Shroud) Of Your 360
Posted: Wed Jun 25, 2008 6:46 pm
TUTORIAL ON HOW TO MODIFY THE WIND TUNNEL (SHROUD) OF YOUR 360
This rather simple "tweak" to your plastic wind tunnel--or shroud--that sits between the fans and the GPU and CPU heatsinks of your 360 should help your machine to run cooler. This modification will help to direct the airflow more efficiently so that the fans (which suck the hot air out of the machine) will exhaust the air in a more concentrated way expelling more heat from the machine...which is what we want to do...to help extend the life of your 360 and avoid the RROD!
WHAT YOU WILL NEED:

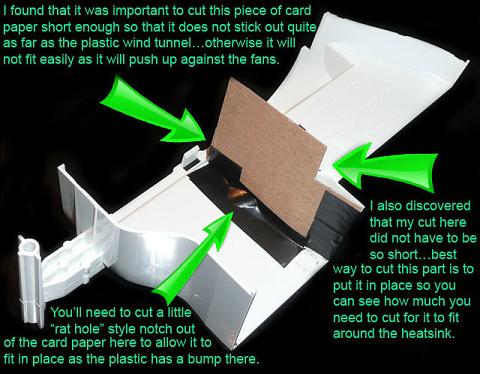
The first piece of card paper I recommend you start with is the only one that goes underneath the wind tunnel. This is the hardest one to get just right...and I recommend starting with this one, as once you get it right, the wind tunnel will sit in place better and the other card pieces can actually be placed on the wind tunnel while it is sitting in place. Hopefully the following picture will be self-descriptive on how to do it. We're only using one piece of card paper for this "wall" piece, which is cut to fit properly. You will need to trim away at the top of it (the part that is exposed to the air in the picture) so that it is the same height as the plastic on the other end.
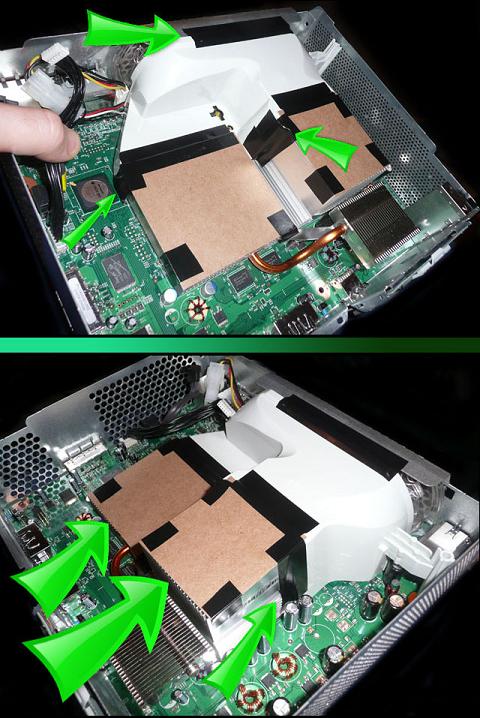
Once you have successfully made the "wall" card piece under the tunnel, you might as well put the wind tunnel back in place as it's easier to do your measuring while the tunnel sits where it will go. You can now measure and cut out 2 card pieces, one for each of the 2 heatsinks. There are two trains of thought on how long you should make these 2 card pieces; you can either have the card paper completely cover the heatsink; or you can have it go nearly to the end, but leave the last 1 to 1 1/2 inches exposed. There is no data to support one method over the other, some people believe that it is better to leave a little bit of the heatsink exposed towards the end while others think that covering the whole heatsink will help the airflow better. (I personally opted for leaving the last 1 to 1/2 inches of the heatsink exposed...and I did this after I took these pictures, so now my card paper does not go to the very end of the heatsinks.) However you decide to do yours, you will want to cut your card paper a little longer than the actual area of the heatsink you want to cover, so that they can overlap onto the plastic housing of the wind tunnel which will make it easier to tape them down to the plastic without too much trouble. Then, you can tape the corners of the cards down if you feel it will help to keep them more snug. Notice in these following pictures how I have put some extra electrical tape on the sides of the housing...where the plastic housing meets the metal heatsinks...as there were gaps there and could have lost some of the air suction. I personally am not very fond of putting too much tape on the metal (or the plastic for that matter), as it will most likely leave a residue...but with some work I'm sure it can be cleaned off later. Finally, I put one long piece of electrical tape at the top of the wind tunnel along where it meets the Xbox 360 case...as there was a considerable gap there...due to the Talismoon Whisper Fan not fitting as snugly as the Xbox 360 stock fan did.
Well, there you have it! Hope that worked for you and that you were able to figure it out. From what I gather, this simple wind tunnel modification can help airflow considerably. If you live in a hot climate where temperatures may exceed 80-90 degrees (in the room where your 360 is set up), this wind tunnel mod may not be enough from preventing your 360 from freezing or RROD'ing...though it could. The next step for further air flow would be to either purchase a Talismoon Whisper Fan Max that allows you to switch it from 5v to 12v; or to modify your current 5v fan so that it runs at 12v all the time. (I personally prefer the option to switch back and forth from 5v to 12v as there is a possibility that MS does monitor fan speeds (as they certainly can)...and if they see that your fan is constantly running at 12v...they may suspect that you have modified your machine...which could result in a Live ban (there has been one report of such a Live ban--though it is possible that this report was "suspect"). If you have the option of switching it from 5v to 12v however, MS probably will not be able to detect that you have modified your fan...as all Xbox 360 stock fans automatically switch from 5v to 12v when the machine heats up...so that is common behavior for an Xbox 360.)
This rather simple "tweak" to your plastic wind tunnel--or shroud--that sits between the fans and the GPU and CPU heatsinks of your 360 should help your machine to run cooler. This modification will help to direct the airflow more efficiently so that the fans (which suck the hot air out of the machine) will exhaust the air in a more concentrated way expelling more heat from the machine...which is what we want to do...to help extend the life of your 360 and avoid the RROD!
WHAT YOU WILL NEED:
- Tools to open your Xbox 360 (refer to the tutorial on how to open your 360 for assistance).
- A pair of scissors.
- Some card paper (most boxes with thin card board will work fine...I personally like the kind that have a glossy finish on one side...it *may* keep a little cooler than the matte finish side).
- Electrical tape.
The first piece of card paper I recommend you start with is the only one that goes underneath the wind tunnel. This is the hardest one to get just right...and I recommend starting with this one, as once you get it right, the wind tunnel will sit in place better and the other card pieces can actually be placed on the wind tunnel while it is sitting in place. Hopefully the following picture will be self-descriptive on how to do it. We're only using one piece of card paper for this "wall" piece, which is cut to fit properly. You will need to trim away at the top of it (the part that is exposed to the air in the picture) so that it is the same height as the plastic on the other end.
Once you have successfully made the "wall" card piece under the tunnel, you might as well put the wind tunnel back in place as it's easier to do your measuring while the tunnel sits where it will go. You can now measure and cut out 2 card pieces, one for each of the 2 heatsinks. There are two trains of thought on how long you should make these 2 card pieces; you can either have the card paper completely cover the heatsink; or you can have it go nearly to the end, but leave the last 1 to 1 1/2 inches exposed. There is no data to support one method over the other, some people believe that it is better to leave a little bit of the heatsink exposed towards the end while others think that covering the whole heatsink will help the airflow better. (I personally opted for leaving the last 1 to 1/2 inches of the heatsink exposed...and I did this after I took these pictures, so now my card paper does not go to the very end of the heatsinks.) However you decide to do yours, you will want to cut your card paper a little longer than the actual area of the heatsink you want to cover, so that they can overlap onto the plastic housing of the wind tunnel which will make it easier to tape them down to the plastic without too much trouble. Then, you can tape the corners of the cards down if you feel it will help to keep them more snug. Notice in these following pictures how I have put some extra electrical tape on the sides of the housing...where the plastic housing meets the metal heatsinks...as there were gaps there and could have lost some of the air suction. I personally am not very fond of putting too much tape on the metal (or the plastic for that matter), as it will most likely leave a residue...but with some work I'm sure it can be cleaned off later. Finally, I put one long piece of electrical tape at the top of the wind tunnel along where it meets the Xbox 360 case...as there was a considerable gap there...due to the Talismoon Whisper Fan not fitting as snugly as the Xbox 360 stock fan did.
Well, there you have it! Hope that worked for you and that you were able to figure it out. From what I gather, this simple wind tunnel modification can help airflow considerably. If you live in a hot climate where temperatures may exceed 80-90 degrees (in the room where your 360 is set up), this wind tunnel mod may not be enough from preventing your 360 from freezing or RROD'ing...though it could. The next step for further air flow would be to either purchase a Talismoon Whisper Fan Max that allows you to switch it from 5v to 12v; or to modify your current 5v fan so that it runs at 12v all the time. (I personally prefer the option to switch back and forth from 5v to 12v as there is a possibility that MS does monitor fan speeds (as they certainly can)...and if they see that your fan is constantly running at 12v...they may suspect that you have modified your machine...which could result in a Live ban (there has been one report of such a Live ban--though it is possible that this report was "suspect"). If you have the option of switching it from 5v to 12v however, MS probably will not be able to detect that you have modified your fan...as all Xbox 360 stock fans automatically switch from 5v to 12v when the machine heats up...so that is common behavior for an Xbox 360.)