Page 1 of 1

my custom 360's

Posted: Wed Apr 15, 2009 11:11 pm
by 04jgc
Just thought i'd share some of my work......

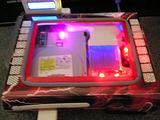
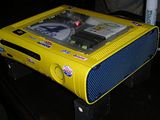
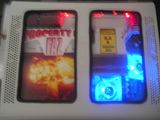
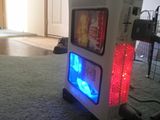
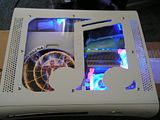
I just started modding a couple months ago. the first one is mine & is still a work in progress. the last one is also still a work in progress. the yellow one was made to look like my brothers race car. I did m y own & showed a few people, all of a sudden about 6 or 7 people said "hey can u make me one of those, how much?" So, my side business was born. I have received 10 orders in the last 3 weeks!!!!! The last one as you can see has a music note cut-out in the window. I will be adding some gibson & fender logos under the glass, this guy is a musician. I also have a collection of cool photos i put on the DVD drive to spice it up a bit. I let them pick a theme, and/or photo so they can somewhat personlize thier 360. the details are just my imagination. These are NOT the XCM dual core cooler kits, but custom made replicas of their idea. These are 12v 40 mm x 10 mm LED fans that i soldered directly to the MB underneath the power supply plug. No pulling power from anywhere else, ESPECIALLY the DVD drive like the crappy XCM kits have you do, not a good idea. I have 3 i am currently working on; 1 i am attemting to free-hand router the Buffalo Sabres logo into the top for my window. it's tough, but it'll look SWEET when it's done!!

Image
Image
Image
Image
Image

edit by:
cofree

Re: my custom 360's

Posted: Wed Apr 15, 2009 11:17 pm
by Shootsteel
Very cool man...tough to see in such a large format but still very cool.

Re: my custom 360's

Posted: Thu Apr 16, 2009 4:13 am
by dalecheesy
Nicely done but as shootsteel said it might help if you resized the pics and reuploaded them as they're HUGE.. :)

Re: my custom 360's

Posted: Thu Apr 16, 2009 9:10 am
by HaGGardSmurf
First one is the coolest in my opinion, the lightning is awesome!

Edited out pic links, pics are now in the first post

Re: my custom 360's

Posted: Thu Apr 16, 2009 10:29 am
by CoFree
yea man
that is some cool stuff there.

but
like the other guys said
the pictures were a bit much

i edited your post
now all someone has to do is click the picture they want to see and it goes to the source.

thanks HaGGardSmurf great post.

Re: my custom 360's

Posted: Thu Apr 16, 2009 10:43 am
by iamwatt
tough! im wit it, i need to start doing this too

Re: my custom 360's

Posted: Thu Apr 16, 2009 12:00 pm
by Hackedit
I just wanna learn how to mount the plexi in the case. Not sure if there are rubber seals or not.

Re: my custom 360's

Posted: Thu Apr 16, 2009 12:20 pm
by Shootsteel
Just thought i'd share some of my work......
Please share, always...I am lax at this, as I do airbrushing and custom Led's and I always fail to take pics.

Thank you for your inspiration...gonna break out me dremmel today and start hacking up a box.

Could you post up some pics of your interior plexi mounting method?

Re: my custom 360's

Posted: Thu Apr 16, 2009 3:36 pm
by HaGGardSmurf
They look sooooo cool...

I am thinking about buying a dead xbox of a friend and messing with the case :P

Re: my custom 360's

Posted: Thu Apr 16, 2009 7:52 pm
by 04jgc
Oops, sorry about the huge pics. Thanks for fixing my post Cofree.

I appreciate the feedback. I expected some negative comments, so that's a nice surprise. The 1st 2 were the x-ray kits, the second 2 were custom cut from 1/8" plexiglass sheets. The one i'm doing now has smoked grey glass, i'll post those when I'm done as well. I'm glad i was able to inspire others to hack up a 360 with their dremels as well, it's a hoot!!! :lol:

As for mounting, i switched from regular glue to a 2 part expoxy. The stuff begins to set in 4 min, workable in 15. I also used rivets, part because i wasn't sure how the expoxy would work (after the glue didn't work too well, i wanted to be sure) & part because i really like the look of the rivets. As it turns out the epoxy is enough on it's own, so i just kept them for asthetic purposes. For the double window, each piece of glass is 4.25" x 7.25". You need to grind all of the plastic support pieces & such from the underside of the top in order for the plexiglass to sit flush. You also loose the rear center screw mount for the top, but 5 are more than enough to hold it on, it doesn't really matter. If you are using rivets, try to leave a decent amount of space betweeen the hole & the edge of the glass, or it will crack the corner off. That's the other reason I'm glad i used epoxy & rivets, 2 of my corners cracked off, but it doesn't matter. You can't see it, & the epoxy keeps it in, so from outside it's all good. I can post pics of the underside of the top if someone really wants to see what i did to mount the glass.

Yes, there are rubber seals available, DO NOT get the thicker kind with the "locking strip". Sure, it sounds great, but it doesn't work for the 360. it's too thick & hits the top of the DVD drive & heatsink, that was a $40 lesson learned. Plus it's also way too thick to bend into the corner of the window on a 360. It works for a computer case, but the window is much larger & the corners aren't as tight. There is also thinner molding available, & i've been told it works ok, but i chose not to use it. The one pic does have what looks like molding, but it is really round silicone o-ring material we use @ my work. I stuck it with double sided tape to look like rubber molding, but honestly wasn't all that happy with the result. I choose to use the dremel to bevel the edge of the hole, then fine sand it with 400 sandpaper instead of the molding.