

This tutorial will teach you how to flash the Firmware of your BenQ DVD drive using iPrep 101 v006. The purpose of flashing an Xbox 360 DVD drive with a Firmware other than the "stock" Firmware from Microsoft that your drive originally comes with is to enable your DVD drive to be able to recognize (read) your backup copies of games (as well as original game discs). Without flashing the Firmware, your 360 would simply not recognize any non-original Xbox 360 game CD. Before getting started, please take a minute to decide what "tools" you may be lacking to successfully complete the flash. While you may not have planned on spending any money to flash your 360's drive, I'm afraid you will need to spend at least a little. Read over the list below and then decide which items you will need to buy before setting out to flash your drive.
BEFORE GETTING STARTED (THINGS YOU MAY NEED):
- Tools to open your Xbox 360 (refer to the tutorial on how to open your 360 for assistance).
- A USB pen drive or a blank CD (to boot into DOS from).
- A "Connectivity Kit". While you don't need a Connectivity Kit to flash your drive, it will make the process a little easier.--and if you plan on flashing more than one or 2 drives (in your lifetime), you may find it to be a justified expense that will pay for itself in the long run. The Connectivity Kit will basically serve the purpose of supplying power to your Xbox 360 DVD drive during the flashing process. You will need to power up and power down the drive several times...and it's not fun having to turn the Xbox 360 on and off to do that each time. You could, however get by with simply using the Xbox 360's own power supply to power your drive, but it will be an easier process (and possibly safer) to flash your DVD drive while it is not getting its power from the 360 itself. I recommend the Xecuter Connectivity Kit V3 (Lite or Pro versions) which allows you to power up/down the 360 DVD drive with the switch of a button. (If you can find one on eBay you will receive it much quicker than waiting for shipping from Canada or Australia.)
- You will also need a compatible SATA (Serial ATA) interface to be able to connect your 360 DVD drive to the computer. Some motherboards come equipped with onboard SATA controllers, but (believe me when I say)...that I have read so many posts from people not being able to properly communicate with their DVD drive and thus not being able to flash the drive and it almost always comes down to them not having the right SATA chipset...usually because they try to use their onboard SATA controller instead of buying the right one. In order to avoid the headache of not knowing why you can't flash your drive...I highly recommend you shell out $11 to buy this tried and proven VIA VT6421A PCI SATA controller. Yes, you will need to install in into your motherboard; but it will make many of your problems disappear during the flashing process.
1. Open iPrep 101 v006
2. Load BenQ Firmware (selecting the RAR archive is all you need to do)
3. Click “No” till you get to the 12x speed Firmware
4. Check the “Patch MTKFlash” box
5. Make sure you have the correct RAID controller selected
6. Select the destination where you want the Firmware placed (if you are using a flash drive you can select to “Format/make device bootable”, otherwise root directory of your C drive is best)
7. Power down the computer (doing a “restart” won’t necessarily work)
DUMPING ORIGINAL FIRMWARE
Using NTFS4DOS bootable CD as boot device (works as long as primary partition is under 32MB)
Download NTFS4DOS here and burn to bootable CD: http://www.360mods.net/tutorial/NTFSDOS.iso" onclick="window.open(this.href);return false;
1. Ensure Xbox 360 DVD drive is powered off and SATA cable unplugged
2. Turn on PC with NTFS4DOS in the CD-drive (making sure BIOS is set to boot from CD)
3. Type “Yes” that you will use DOS for private use
4. Navigate (CD..) to the iPrep directory
5. Once in the iPrep directory in DOS, plug SATA cable to the DVD drive (still keeping the drive off)
6. Type: dben 1234567 12345 (12 digit S/N of actual unit you are flashing) and hit Enter
7. It will prompt you to make sure drive is off, then press any key
8. Type: Y and hit Enter to resend MTK
9. Turn on DVD drive, wait 2 seconds (status toggles between 0X51 & 0XD1)
10. Turn off DVD drive, wait 2 seconds
11. Turn on DVD drive and it should begin dumping all 4 banks
12. FirmTool should run to check that the dump was OK (check for “Success” message)
13. Power down DVD drive
14. Power down Computer
15. Boot into Windows
16. Copy original firmware to several places for safety
17. Check Firmware with FirmWare Toolbox to make sure the dump/key is good (should have a string of different letters and numbers…that means it’s a good key. If they are all similar numbers and letters, means bad dump…do it again.)
FLASHING NEW FIRMWARE
1. Ensure the Xbox 360 DVD drive is off, but SATA cable is plugged in
2. Go into DOS same was as before and CD.. to the iPrep directory
3. Type: fben 12343567 12345 (12 digit S/N of actual unit you are flashing) and hit Enter
4. Hit Enter again
5. Type: Y then Enter to resend MTK
6. Turn on DVD drive (status changes between D1 & 51), it erases (takes 2 seconds)
7. Turn off DVD drive for 2 seconds
8. Turn on DVD drive
9. Turn off DVD drive
10. Type: Y and hit Enter to resend MTK again
11. Turn on DVD drive (this time it should flash all 4 banks)
12. Turn off DVD drive
13. Turn off Computer
RESTORING ORIGINAL FIRMWARE
In the event that you need to restore the original Firmware, follow these instructions:
1. Open Firmware Toolbox v4.5 and open you backed up original Firmware.
2. Make sure that your original Firmware is good.
3. Open iPrep 101 v006
4. Create either a boot flash (if using a flash drive), or a Firmware folder if using the bootable CD method. Either way, the following directory will be created (either on your flash drive, or your C drive):
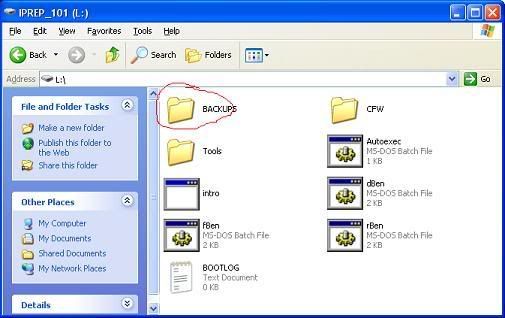
5. In the Backups folder create a folder; name it the first 7 digits of your 360’s serial number. Then inside that folder create another folder and name it the last 5 digits of your serial number
6. In that folder put a copy of your Original Firmware. Make sure the file name is “BENQ-OFW.BIN”
7. Now follow the same steps from “Flashing New Firmware” but instead of typing “fben 1234567 12345”, type “rben (or rsam) 1234567 12345”. All the other steps are the same as “Flashing New Firmware”


